
Introduction
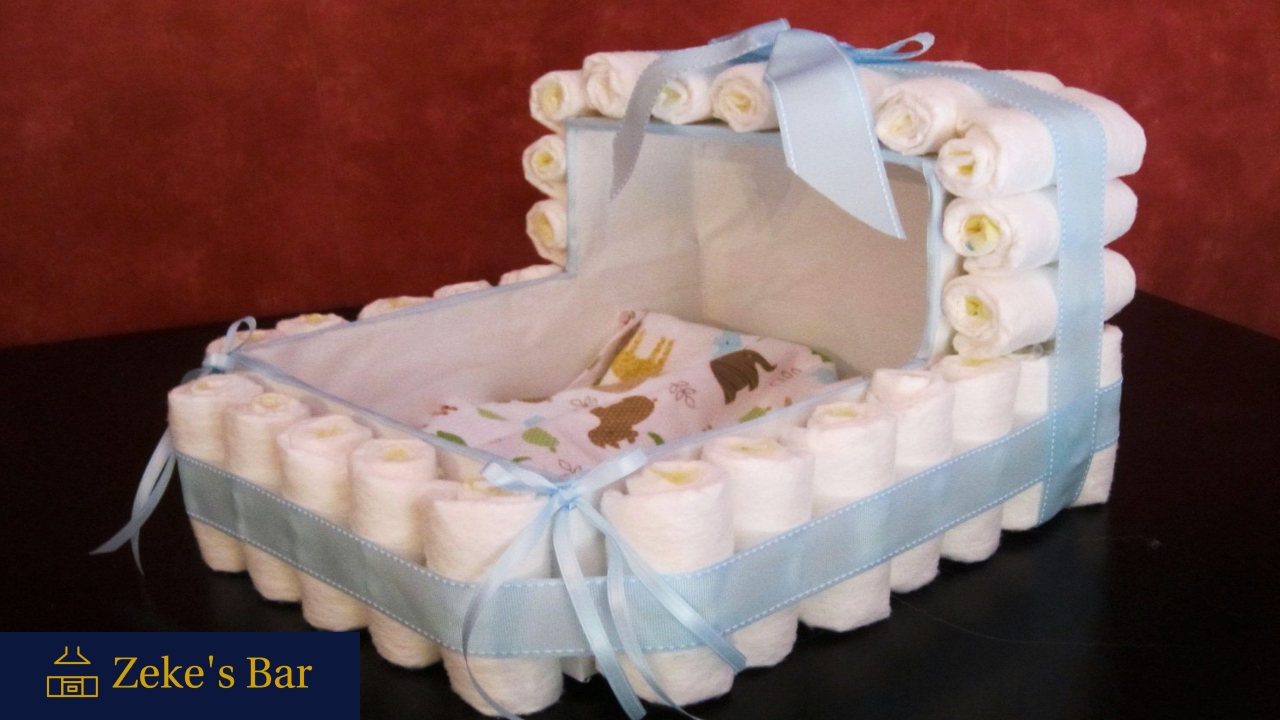
A bassinet diaper cake can be a charming and practical gift if you’re attending a baby shower or celebrating a newborn’s arrival. In this guide, we’ll walk you through making a stunning bassinet diaper cake that will impress any parent-to-be.
Materials Needed
Before diving into the steps, gather the following materials:
– Diapers (preferably size 1 or 2)
– Ribbon
– Rubber bands
– Cardboard or sturdy base
– Decorative accents (such as baby toys, pacifiers, or rattles)
– Adhesive tape
– Scissors
– Cake topper (optional)
Step 1: Roll the Diapers
Start by rolling each diaper tightly from the open end to the closed end. Secure each roll with a rubber band to maintain its shape.
Step 1.1: Determine the Number of Diapers
Decide how large you want your bassinet to be and estimate the number of diapers needed. Typically, a small bassinet requires around 25-30 diapers, while a larger one may need 50 or more.
Step 2: Create the Base
Take your cardboard or sturdy base and shape it into an oval or rectangular base, resembling the bottom of a bassinet. This will provide stability for your diaper cake.
Step 2.1: Cover the Base
If desired, cover the base with decorative paper or fabric to add a personalized touch to your bassinet.
Step 3: Build the Frame
Arrange the rolled diapers around the perimeter of the base, standing them upright to form the walls of the bassinet. Secure the diapers together with ribbon or rubber bands.
3.1: Stabilize the Frame
Use adhesive tape to secure the diapers to the base, ensuring that the frame remains sturdy and intact.
Step 4: Add Layers
Continue building upward by adding additional layers of rolled diapers, gradually decreasing the diameter to create the tapered shape of a bassinet.
Step 4.1: Maintain Symmetry
As you add layers, make sure to maintain symmetry and balance to achieve a visually appealing design.
Step 5: Decorate
Once the basic structure is complete, it’s time to decorate your bassinet diaper cake! Add ribbon bows, baby toys, pacifiers, and other decorative accents to embellish the cake.
Step 5.1: Personalize the Cake
Consider the color scheme and theme of the baby shower or nursery when selecting decorations to personalize the cake.
Step 6: Finishing Touches
To complete your bassinet diaper cake, add a cake topper if desired. This could be a plush toy, a miniature baby figurine, or a decorative accent that ties the theme together.
Read: How to Make a Tractor Diaper Cake
Conclusion
Creating a bassinet diaper cake is a delightful way to celebrate the impending arrival of a little one. With a few simple materials and a bit of creativity, you can craft a memorable and practical gift that the parents-to-be will cherish.
FAQs
1. Can I use any size of diapers to make a bassinet diaper cake?
Yes, you can use any size of diapers, but size 1 or 2 diapers are commonly preferred for their versatility and suitability for newborns.
2. How long does it take to make a bassinet diaper cake?
The time required to make a bassinet diaper cake depends on its size and complexity. A small cake can be completed in about an hour, while larger cakes may take two to three hours or more.
3. Can I customize the decorations on my bassinet diaper cake?
Absolutely! Feel free to get creative and personalize the decorations to match the theme or color scheme of the baby shower or nursery.
4. Are bassinet diaper cakes reusable?
While the diapers themselves are intended for single use, the decorative elements of the bassinet diaper cake can be reused or repurposed for other occasions or nursery decor.
5. How should I transport a bassinet diaper cake?
To transport a bassinet diaper cake safely, place it on a sturdy base and secure it with adhesive tape or ribbon. Avoid tilting or tipping the cake during transport to prevent damage to the structure.