
Introduction
The KitchenAid mixer is a culinary staple in kitchens worldwide. Whether whipping up a cake batter or kneading bread dough, this versatile appliance makes cooking a breeze. However, properly attaching the bowl to your mixer is crucial to ensure its effectiveness and longevity. Let’s dive into the step-by-step guide to securing a bowl to your KitchenAid mixer like a pro!
Understanding Attach a Bowl to a KitchenAid Mixer
-
Types of Bowls
KitchenAid offers bowls in various materials, including stainless steel for durability, glass for measuring visibility, and ceramic for an elegant look. Each type has unique features suited for different tasks.
-
Different Bowl Sizes
From compact 3-quart bowls to large 7-quart ones, KitchenAid bowls cater to light home baking and heavy-duty tasks. Picking the right size ensures efficient mixing and reduces spillage
-
Bowl Styles
There are two main mixer models: tilt-head and bowl-lift. Each model has a specific way of attaching the bowl, making it essential to know your mixer’s design
Preparing to Attach a Bowl to a KitchenAid Mixer
-
Inspecting Your KitchenAid Mixer
Before starting, ensure your mixer is clean and in good working order. Check the base and bowl for any food residue or debris that could interfere with proper attachment.
-
Identifying Your Mixer Model
Determine if you have a tilt-head or bowl-lift mixer. This distinction is key since the bowl attachment process differs for each.
-
Choosing the Right Bowl
Use a compatible bowl designed for your specific model. Refer to your user manual for guidance if needed.
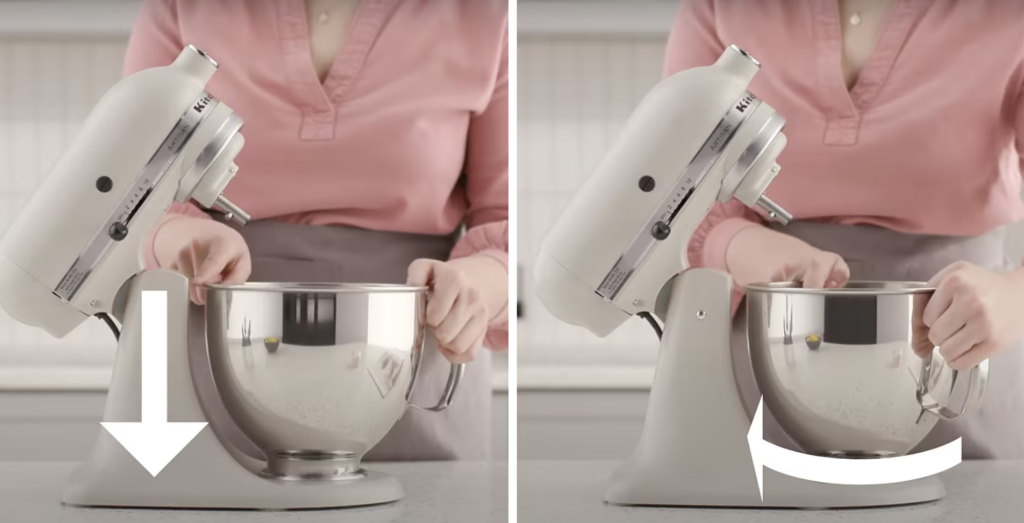
Steps to Attach a Bowl to a Tilt-Head Mixer
-
Positioning the Mixer Head
Start by tilting the mixer’s head back to provide ample space for bowl placement.
-
Aligning the Bowl with the Base
Place the bowl over the base plate and align the bowl’s notches with the base slots.
-
Securing the Bowl into Place
Twist the bowl clockwise until it locks securely into place. You should hear or feel a click to confirm it’s attached properly.
Steps to Attach a Bowl to a Bowl-Lift Mixer
-
Identifying the Bowl-Lift Arms
Locate the two arms on either side of the mixer that holds the bowl.
-
Properly Placing the Bowl on the Arms
Position the bowl so the pins on its sides align with the grooves on the arms.
-
Locking the Bowl Securely
Push down gently and twist until the bowl locks into place. Double-check by lifting the bowl-lift lever and ensuring the bowl remains stable.
Troubleshooting Common Issues
-
Bowl Not Aligning Correctly
Ensure no obstructions are preventing proper alignment. Clean the base or arms if necessary.
-
Loose or Unstable Bowl
Recheck the locking mechanism to confirm the bowl is securely attached.
-
Bowl Does Not Lock Properly
Inspect the bowl’s notches or pins for wear or damage. Replace the bowl if it’s no longer compatible.
Maintenance Tips for Your Bowl and Mixer
-
Cleaning Your Mixer Bowl
Wash the bowl with warm, soapy water after every use. Avoid abrasive scrubbers to maintain their finish.
-
Checking for Wear and Tear
Regularly inspect the bowl and mixer for signs of damage, such as cracks or loose parts.
-
Storing Your Mixer Properly
Store your mixer in a cool, dry place, and keep the bowl detached when not in use.
Benefits of Proper Bowl Attachment
-
Enhanced Stability During Mixing
Properly attached bowls reduce vibrations and keep the mixer stable during operation.
-
Consistent Mixing Results
A securely locked bowl ensures even ingredient distribution, leading to perfect recipes every time.
-
Prolonging the Life of Your Mixer
Correct bowl usage minimizes wear on your mixer’s components, extending its lifespan.
Read: Can a KitchenAid Mixer Bowl Go in the Dishwasher?
Conclusion
Attaching a bowl to your KitchenAid mixer may seem simple, but doing it correctly ensures better mixing results and keeps your appliance in top shape. By following these steps, you’ll be ready to tackle any recipe with confidence.
FAQs
Why is my KitchenAid bowl wobbling?
A wobbling bowl may indicate it’s not properly locked into place. Recheck the alignment and secure it tightly.
Can I use any KitchenAid bowl with my mixer?
No, only use bowls designed for your specific mixer model to ensure compatibility.
How do I clean a stuck bowl?
If the bowl is stuck, gently twist it counterclockwise while applying steady pressure to release it.
What is the correct bowl size for specific recipes?
Refer to your recipe’s yield and match it with the appropriate bowl size. Smaller recipes work best in smaller bowls to avoid uneven mixing.
How often should I check my mixer for issues?
Regularly inspect your mixer and bowl after every few uses to catch any potential issues early.